Webpack配置案例
PWA配置
概念以及作用
PWA全称Progressive Web Application(渐进式应用框架),它能让我们主动缓存文件,这样用户离线后依然能够使用我们缓存的文件打开网页,而不至于让页面挂掉,实现这种技术需要安装workbox-webpack-plugin插件
安装插件
$ npm install workbox-webpack-plugin -D
webpack.config.js文件配置
// PWA只有在线上环境才有效,所以需要在webpack.prod.js文件中进行配置
const WorkboxWebpackPlugin = require('workbox-webpack-plugin');
const prodConfig = {
  // 其它配置
  plugins: [
    new MiniCssExtractPlugin({}),
    new WorkboxWebpackPlugin.GenerateSW({
      clientsClaim: true,
      skipWaiting: true
    })
  ]
}
module.exports = merge(commonConfig, prodConfig);
以上配置完毕后,让我们使用npm run build打包看一看生成了哪些文件,dist目录的打包结果如下:
|-- dist
|   |-- index.html
|   |-- main.f28cbac9bec3756acdbe.js
|   |-- main.f28cbac9bec3756acdbe.js.map
|   |-- precache-manifest.ea54096f38009609a46058419fc7009b.js
|   |-- service-worker.js
我们可以代码块高亮的部分,多出来了precache-manifest.xxxxx.js文件和service-worker.js,就是这两个文件能让我们实现PWA。
改写index.js
提示
需要判断浏览器是否支持PWA,支持的时候我们才进行注册,注册的.js文件为我们打包后的service-worker.js文件。
console.log('hello,world');
if('serviceWorker' in navigator) {
  navigator.serviceWorker.register('/service-worker.js').then((register) => {
    console.log('注册成功');
  }).catch(error => {
    console.log('注册失败');
  })
}
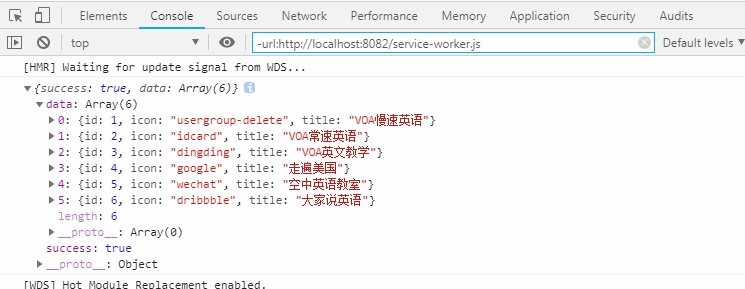
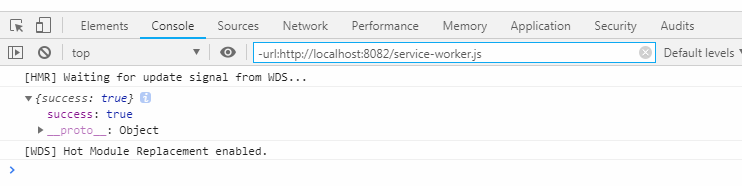
PWA实际效果
在npm run dev后,我们利用webpack-dev-server启动了一个小型的服务器,然后我们停掉这个服务器,刷新页面,PWA的实际结果如下图所示

WebpackDevServer请求转发
在这一小节中,我们要学到的技能有:
- 如何进行接口代理配置
- 如何使用接口路径重写
- 其他常见配置的介绍
假设我们现在有这样一个需求:我有一个URL地址(http://www.dell-lee.com/react/api/header.json),我希望我请求的时候,请求的地址是/react/api/header.json,能有一个什么东西能自动帮我把请求转发到http://www.dell-lee.com域名下,那么这个问题该如何解决呢?
解决办法
可以使用 Webpack 的webpack-dev-server这个插件来解决,其中需要配置proxy属性。
如何进行接口代理配置
既然我们要做请求,那么安装axios来发请求再合适不过了,使用如下命令安装axios:
$ npm install axios --save-dev
因为我们的请求代理只能在开发环境下使用,线上的生产环境,需要走其他的代理配置,所以我们需要在webpack.dev.js中进行代理配置
const devConfig = {
  // 其它配置
  devServer: {
    contentBase: './dist',
    open: false,
    port: 3000,
    hot: true,
    hotOnly: true,
    proxy: {
      '/react/api': {
        target: 'http://www.dell-lee.com'
      }
    }
  }
}
以上配置完毕后,我们在index.js文件中引入axios模块,再做请求转发。
import axios from 'axios';

axios.get('/react/api/header.json').then((res) => {
  let {data,status} = res;
  console.log(data);
})
使用npm run dev后, 我们可以在浏览器中看到,我们已经成功请求到了我们的数据。
如何使用接口路径重写
现在依然假设有这样一个场景:http://www.dell-lee.com/react/api/header.json这个后端接口还没有开发完毕,但后端告诉我们可以先使用http://www.dell-lee.com/react/api/demo.json 这个测试接口,等接口开发完毕后,我们再改回来。
解决办法
解决这个问题最佳办法是,代码中的地址不能变动,我们只在proxy代理中处理即可,使用pathRewrite属性进行配置。
const devConfig = {
  // 其它配置
  devServer: {
    contentBase: './dist',
    open: false,
    port: 3000,
    hot: true,
    hotOnly: true,
    proxy: {
      '/react/api': {
        target: 'http://www.dell-lee.com',
        pathRewrite: {
          'header.json': 'demo.json'
        }
      }
    }
  }
}
同样,我们打包后在浏览器中可以看到,我们的测试接口的数据已经成功拿到了。
其他常见配置的含义
转发到https: 一般情况下,不接受运行在https上,如果要转发到https上,可以使用如下配置
module.exports = {
  //其它配置
  devServer: {
    proxy: {
      '/react/api': {
        target: 'https://www.dell-lee.com',
        secure: false
      }
    }
  }
}
跨域: 有时候,在请求的过程中,由于同源策略的影响,存在跨域问题,我们需要处理这种情况,可以如下进行配置。
module.exports = {
  //其它配置
  devServer: {
    proxy: {
      '/react/api': {
        target: 'https://www.dell-lee.com',
        changeOrigin: true,
      }
    }
  }
}
代理多个路径到同一个target: 代理多个路径到同一个target,可以如下进行配置
module.exports = {
  //其它配置
  devServer: {
    proxy: [{
      context: ['/vue/api', '/react/api'],
      target: 'http://www.dell-lee.com'
    }]
  }
}
多页打包
现在流行的前端框架都推行单页引用(SPA),但有时候我们不得不兼容一些老的项目,他们是多页的,那么如何进行多页打包配置呢? 现在我们来思考一个问题:多页运用,即 多个入口文件+多个对应的html文件 ,那么我们就可以配置 多个入口+配置多个html-webpack-plugin 来进行。
场景
假设现在我们有这样三个页面:index.html, list.html, detail.html,我们需要配置三个入口文件,新建三个.js文件。
在webpack.common.js中配置多个entry并使用html-webpack-plugin来生成对应的多个.html页面。 HtmlWebpackPlugin参数说明:
template:代表以哪个HTML页面为模板filename:代表生成页面的文件名chunks:代表需要引用打包后的哪些.js文件
module.exports = {
  // 其它配置
  entry: {
    index: './src/index.js',
    list: './src/list.js',
    detail: './src/detail.js',
  },
  plugins: [
    new HtmlWebpackPlugin({
      template: 'src/index.html',
      filename: 'index.html',
      chunks: ['index']
    }),
    new HtmlWebpackPlugin({
      template: 'src/index.html',
      filename: 'list.html',
      chunks: ['list']
    }),
    new HtmlWebpackPlugin({
      template: 'src/index.html',
      filename: 'detail.html',
      chunks: ['detail']
    }),
    new CleanWebpackPlugin()
  ]
}
在src目录下新建三个.js文件,名字分别是:index.js,list.js和detail.js,它们的代码如下:
// index.js代码
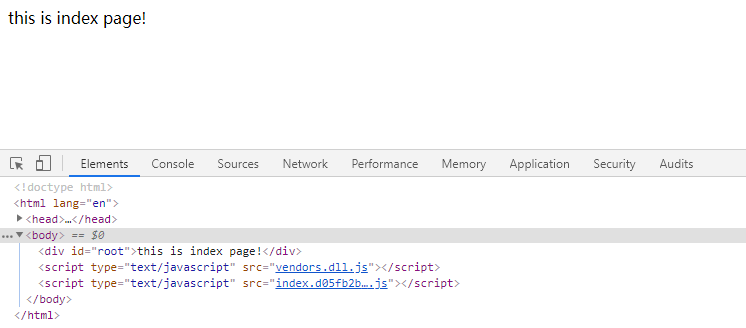
document.getElementById('root').innerHTML = 'this is index page!'
// list.js代码
document.getElementById('root').innerHTML = 'this is list page!'
// detail.js代码
document.getElementById('root').innerHTML = 'this is detail page!'
运行npm run build进行打包:
$ npm run build
打包后的dist目录:
|-- dist
|   |-- detail.dae2986ea47c6eceecd6.js
|   |-- detail.dae2986ea47c6eceecd6.js.map
|   |-- detail.html
|   |-- index.ca8e3d1b5e23e645f832.js
|   |-- index.ca8e3d1b5e23e645f832.js.map
|   |-- index.html
|   |-- list.5f40def0946028db30ed.js
|   |-- list.5f40def0946028db30ed.js.map
|   |-- list.html
随机选择list.html在浏览器中运行,结果如下:
思考
现在只有三个页面,即我们要配置三个入口+三个对应的html,如果我们有十个入口,那么我们也要这样做重复的劳动吗?有没有什么东西能帮助我们自动实现呢?答案当然是有的!
我们首先定义一个makeHtmlPlugins方法,它接受一个 Webpack 配置项的参数configs,返回一个plugins数组
const makeHtmlPlugins = function (configs) {
  const htmlPlugins = []
  Object.keys(configs.entry).forEach(key => {
    htmlPlugins.push(
      new HtmlWebpackPlugin({
        template: 'src/index.html',
        filename: `${key}.html`,
        chunks: [key]
      })
    )
  })
  return htmlPlugins
}
通过调用makeHtmlPlugins方法,它返回一个html的plugins数组,把它和原有的plugin进行合并后再复制给configs
configs.plugins = configs.plugins.concat(makeHtmlPlugins(configs));
module.exports = configs;
以上配置完毕后,打包结果依然还是一样的,请自行测试,以下是webpack.commom.js完整的代码:
const path = require('path');
const webpack = require('webpack');
const HtmlWebpackPlugin = require('html-webpack-plugin');
const { CleanWebpackPlugin } = require('clean-webpack-plugin');
const miniCssExtractPlugin = require('mini-css-extract-plugin');
const optimizaCssAssetsWebpackPlugin = require('optimize-css-assets-webpack-plugin');
const configs = {
  entry: {
    index: './src/index.js',
    list: './src/list.js',
    detail: './src/detail.js'
  },
  module: {
    rules: [
      {
        test: /\.css$/,
        use: [
          {
            loader: miniCssExtractPlugin.loader,
            options: {
              hmr: true,
              reloadAll: true
            }
          },
          'css-loader'
        ]
      },
      {
        test: /\.js$/,
        exclude: /node_modules/,
        loader: [
          {
            loader: "babel-loader"
          },
          {
            loader: "imports-loader?this=>window"
          }
        ]
      }
    ]
  },
  plugins: [
    new CleanWebpackPlugin(),
    new miniCssExtractPlugin({
      filename: '[name].css'
    }),
    new webpack.ProvidePlugin({
      '$': 'jquery',
      '_': 'lodash'
    })
  ],
  optimization: {
    splitChunks: {
      chunks: 'all'
    },
    minimizer: [
      new optimizaCssAssetsWebpackPlugin()
    ]
  },
  output: {
    filename: '[name].js',
    path: path.resolve(__dirname,'../dist')
  }
}
const makeHtmlPlugins = function (configs) {
  const htmlPlugins = []
  Object.keys(configs.entry).forEach(key => {
    htmlPlugins.push(
      new HtmlWebpackPlugin({
        template: 'src/index.html',
        filename: `${key}.html`,
        chunks: [key]
      })
    )
  })
  return htmlPlugins
}
configs.plugins = configs.plugins.concat(makeHtmlPlugins(configs))
module.exports = configs
如何打包一个库文件(Library)
在上面所有的 Webpack 配置中,几乎都是针对业务代码的,如果我们要打包发布一个库,让别人使用的话,该怎么配置?在下面的几个小节中,我们将来讲一讲该怎么样打包一个库文件,并让这个库文件在多种场景能够使用。
创建一个全新的项目
步骤
- 创建library项目
- 使用
npm init -y进行配置package.json - 新建
src目录,创建math.js文件、string.js文件、index.js文件 - 根目录下创建
webpack.config.js文件 - 安装
webpack、webpack-cli
按上面的步骤走完后,你的目录大概看起来是这样子的:
|-- src
|   |-- index.js
|   |-- math.js
|   |-- string.js
|-- webpack.config.js
|-- package.json
初始化package.json
// 初始化后,改写package.json
{
  "name": "library",
  "version": "1.0.0",
  "description": "",
  "main": "index.js",
  "scripts": {
    "build": "webpack"
  },
  "keywords": [],
  "author": "",
  "license": "MIT"
}
创建src目录,并添加文件
在src目录下新建math.js,它的代码是四则混合运算的方法,如下:
export function add(a, b) {
  return a + b;
}
export function minus(a, b) {
  return a - b;
}
export function multiply(a, b) {
  return a * b;
}
export function division(a, b) {
  return a / b;
}
在src目录下新建string.js,它有一个join方法,如下:
export function join(a, b) {
  return a + '' + b;
}
在src目录下新建index.js文件,它引用math.js和string.js并导出,如下:
import * as math from './math';
import * as string from './string';

export default { math, string };
添加webpack.config.js
说明
因为我们是要打包一个库文件,所以mode只配置为生产环境(production)即可。
在以上文件添加完毕后,我们来配置一下webpack.config.js文件,它的代码非常简单,如下:
const path = require('path');
module.exports = {
  mode: 'production',
  entry: './src/index.js',
  output: {
    filename: 'library.js',
    path: path.resolve(__dirname, 'dist')
  }
}
安装Webpack
根据涉及到 Webpack 打包,所以我们需要使用npm instll进行安装:
$ npm install webpack webpack-cli -D
进行第一次打包
使用npm run build进行第一次打包,在dist目录下会生成一个叫library.js的文件,我们要测试这个文件的话,需要在dist目录下新建index.html
$ npm run build
$ cd dist
$ touch index.html
在index.html中引入library.js文件:
<script src="./library.js"></script>
至此,我们已经基本把项目目录搭建完毕,现在我们来考虑一下,可以在哪些情况下使用我们打包的文件:
- 使用
ES Module语法引入,例如import library from 'library' - 使用
CommonJS语法引入,例如const library = require('library') - 使用
AMD、CMD语法引入,例如require(['library'], function() {// todo}) - 使用
script标签引入,例如<script src="library.js"></script>
打包方案
针对以上几种使用场景,我们可以在output中配置library和libraryTarget属性(注意:这里的library和libraryTarget和我们的库名字library.js没有任何关系,前者是webpack固有的配置项,后者只是我们随意取的一个名字)
const path = require('path');
module.exports = {
  mode: 'production',
  entry: './src/index.js',
  output: {
    filename: '[name].js',
    path: path.resolve(__dirname, 'dist'),
    library: 'library',
    libraryTarget: 'umd'
  }
}
配置属性说明:
library:这个属性指,我们库的全局变量是什么,类似于jquery中的$符号libraryTarget: 这个属性指,我们库应该支持的模块引入方案,umd代表支持ES Module、CommomJS、AMD以及CMD
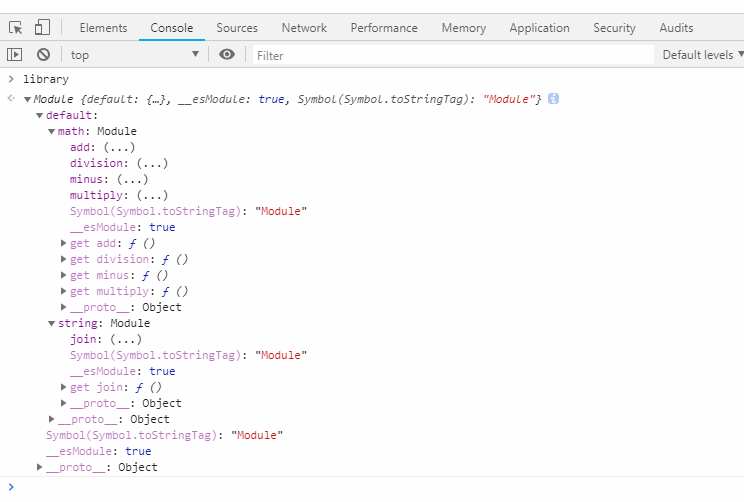
在配置完毕后,我们再使用npm run build进行打包,并在浏览器中运行index.html,在console控制台输出library这个全局变量,结果如下图所示:
以上我们所写的库非常简单,在实际的库开发过程中,往往需要使用到一些第三方库,如果我们不做其他配置的话,第三方库会直接打包进我们的库文件中。
如果用户在使用我们的库文件时,也引入了这个第三方库,就造成了重复引用的问题,那么如何解决这个问题呢?
解决办法
可以在webpack.config.js文件中配置externals属性
在string.js文件的join方法中,我们使用第三方库lodash中的_join()方法来进行字符串的拼接。
import _ from 'lodash';
export function join(a, b) {
  return _.join([a, b], ' ');
}
在修改完毕string.js文件后,使用npm run build进行打包,发现lodash直接打包进了我们的库文件,造成库文件积极臃肿,有70.8kb。
$ npm run build
Built at: 2019-04-05 00:47:25
     Asset      Size  Chunks             Chunk Names
library.js  70.8 KiB       0  [emitted]  main
针对以上问题,我们可以在webpack.config.js中配置externals属性,更多externals的用法请点击externals
const path = require('path');
module.exports = {
  mode: 'production',
  entry: './src/index.js',
  externals: ['lodash'],
  output: {
    filename: 'library.js',
    path: path.resolve(__dirname, 'dist'),
    library: 'library',
    libraryTarget: 'umd'
  }
}
配置完externals后,我们再进行打包,它的打包结果如下,我们可以看到我们的库文件又变回原来的大小了,证明我们的配置起作用了。
$ npm run build
Built at: 2019-04-05 00:51:22
     Asset      Size  Chunks             Chunk Names
library.js  1.63 KiB       0  [emitted]  main
如何发布并使用我们的库文件
在打包完毕后,我们如何发布我们的库文件呢,以下是发布的步骤:
步骤
- 注册
npm账号 - 修改
package.json文件的入口,修改为:"main": "./dist/library.js" - 运行
npm adduser添加账户名称 - 运行
npm publish命令进行发布 - 运行
npm install xxx来进行安装
注意
- 为了维护
npm仓库的干净,我们并未实际运行npm publish命令,因为我们的库是无意义的,发布上去属于垃圾代码,所以为了维护npm仓库的干净性,请自行尝试发布。 - 自己包的名字不能和
npm仓库中已有的包名字重复,所以需要在package.json中给name属性起一个特殊一点的名字才行,例如"name": "why-library-2019"
TypeScript配置
随着TypeScript的不断发展,相信未来使用TypeScript来编写 JS 代码将变成主流形式,那么如何在 Webpack 中配置支持TypeScript呢?可以安装ts-loader和typescript来解决这个问题。
新建一个项目webpack-typescript
提示
新创建一个项目,命名为webpack-typescript,并按如下步骤处理:
- 使用
npm init -y初始化package.json文件,并在其中添加buildWebpack打包命令 - 新建
webpack.config.js文件,并做一些简单配置,例如entry、output等 - 新建
src目录,并在src目录下新建index.ts文件 - 新建
tsconfig.json文件,并做一些配置 - 安装
webpack和webpack-cli - 安装
ts-loader和typescript
按以上步骤完成后,项目目录大概如下所示:
|-- src
|   |-- index.ts
|-- tsconfig.json
|-- webpack.config.js
|-- package.json
在package.json中添加好打包命令命令:
"scripts": {
  "build": "webpack"
},
接下来我们需要对webpack.config.js做一下配置:
const path = require('path');
module.exports = {
  mode: 'production',
  module: {
    rules: [
      {
        test: /\.(ts|tsx)?$/,
        use: {
          loader: 'ts-loader'
        }
      }
    ]
  },
  entry: {
    main: './src/index.ts'
  },
  output: {
    filename: '[name].js',
    path: path.resolve(__dirname, 'dist')
  }
}
在tsconfig.json里面进行typescript的相关配置,配置项的说明如下
module: 表示我们使用ES6模块target: 表示我们转换成ES5代码allowJs: 允许我们在.ts文件中通过import语法引入其他.js文件
{
  "compilerOptions": {
    "module": "ES6",
    "target": "ES5",
    "allowJs": true
  }
}
在src/index.ts文件中书写TypeScript代码,像下面这样
class Greeter {
  greeting: string
  constructor(message: string) {
    this.greeting = message;
  }
  greet() {
    return 'hello, ' + this.greeting;
  }
}

let greeter = new Greeter('why');
console.log(greeter.greet());
打包测试
- 运行
npm run build进行打包 - 在生成
dist目录下,新建index.html,并引入打包后的main.js文件 - 在浏览器中运行
index.html

使用其他模块的类型定义文件
说明
如果我们要使用lodash库,必须安装其对应的类型定义文件,格式为@types/xxx
安装lodash对应的typescript类型文件:
$ npm install lodash @types/lodash -D
安装完毕后,我们在index.ts中引用lodash,并使用里面的方法:
import * as _ from 'lodash'

class Greeter {
  greeting: string
  constructor(message: string) {
    this.greeting = message;
  }
  greet() {
    return _.join(['hello', this.greeting], '**');
  }
}

let greeter = new Greeter('why');
console.log(greeter.greet());
打包测试
使用npm run build,在浏览器中运行index.html,结果如下:
