$mount方法
代码分析
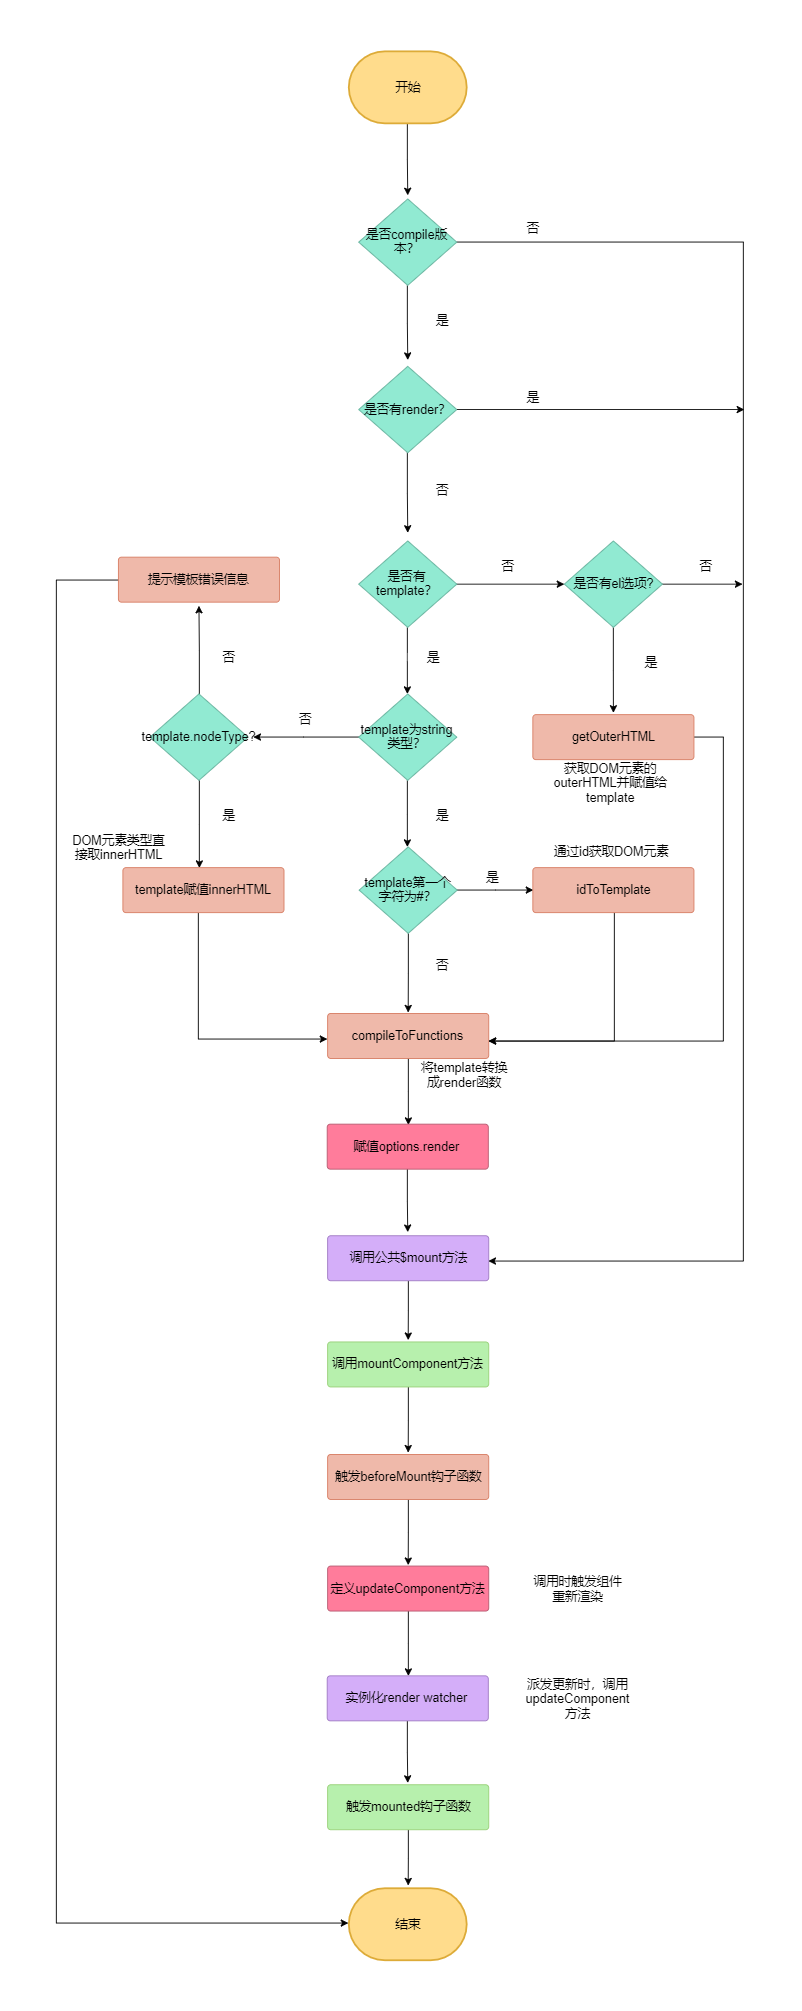
在前面我们已经知道,Vue会根据不同的情况去挂载不同的$mount方法,其中带compiler版本的$mount方法是在src/platforms/web/entry-runtime-with-compiler.js文件中被重新定义,其代码如下:
const mount = Vue.prototype.$mount
Vue.prototype.$mount = function (
  el?: string | Element,
  hydrating?: boolean
): Component {
  el = el && query(el)

  /* istanbul ignore if */
  if (el === document.body || el === document.documentElement) {
    process.env.NODE_ENV !== 'production' && warn(
      `Do not mount Vue to <html> or <body> - mount to normal elements instead.`
    )
    return this
  }

  const options = this.$options
  // resolve template/el and convert to render function
  if (!options.render) {
    let template = options.template
    if (template) {
      if (typeof template === 'string') {
        if (template.charAt(0) === '#') {
          template = idToTemplate(template)
          /* istanbul ignore if */
          if (process.env.NODE_ENV !== 'production' && !template) {
            warn(
              `Template element not found or is empty: ${options.template}`,
              this
            )
          }
        }
      } else if (template.nodeType) {
        template = template.innerHTML
      } else {
        if (process.env.NODE_ENV !== 'production') {
          warn('invalid template option:' + template, this)
        }
        return this
      }
    } else if (el) {
      template = getOuterHTML(el)
    }
    if (template) {
      /* istanbul ignore if */
      if (process.env.NODE_ENV !== 'production' && config.performance && mark) {
        mark('compile')
      }

      const { render, staticRenderFns } = compileToFunctions(template, {
        outputSourceRange: process.env.NODE_ENV !== 'production',
        shouldDecodeNewlines,
        shouldDecodeNewlinesForHref,
        delimiters: options.delimiters,
        comments: options.comments
      }, this)
      options.render = render
      options.staticRenderFns = staticRenderFns

      /* istanbul ignore if */
      if (process.env.NODE_ENV !== 'production' && config.performance && mark) {
        mark('compile end')
        measure(`vue ${this._name} compile`, 'compile', 'compile end')
      }
    }
  }
  return mount.call(this, el, hydrating)
}
我们可以看到,在代码最顶部它首先获取并缓存了Vue.prototype上原始的$mount方法,然后重新在Vue.prototype上定义$mount方法,其中在最新的$mount方法的最底部,还调用了缓存下来的原始$mount方法。
那么,这个原始的$mount方法又在哪里被定义呢,其实它是在src/core/platforms/web/runtime/index.js中被定义,其代码如下:
Vue.prototype.$mount = function (
  el?: string | Element,
  hydrating?: boolean
): Component {
  el = el && inBrowser ? query(el) : undefined
  return mountComponent(this, el, hydrating)
}
搞清楚了这两个$mount方法的区别后,我们接下来首先分析带compiler版本的$mount方法实现,它主要做三件事情:获取el元素、处理template和调用原始$mount方法,我们将根据这几个步骤来分别进行代码分析。
代码分析:
- 获取el元素:还记得在
main.js入口文件中,我们调用$mount方法时传递了#app参数吗。
import Vue from 'vue'
import App from './App.vue'
new Vue({
  render: h => h(App)
}).$mount('#app')
当执行$mount方法的时候,首先要做的就是根据传递的el元素获取到要挂载的DOM元素节点,它使用query这个方法来获取DOM元素节点,其中这个方法的代码如下:
export function query (el: string | Element): Element {
  if (typeof el === 'string') {
    const selected = document.querySelector(el)
    if (!selected) {
      process.env.NODE_ENV !== 'production' && warn(
        'Cannot find element: ' + el
      )
      return document.createElement('div')
    }
    return selected
  } else {
    return el
  }
}
我们可以看到在query方法中,首先对el参数做了判断,如果不是string类型,则直接返回;如果是则通过document.querySelector去获取DOM元素,如果没有获取到,则创建一个div元素返回并提示错误信息。
在看完以上代码后,我们可能有一个疑问:什么时候el参数不为string类型呢?其实$mount方法可以直接接受一个DOM元素节点,既意味着我们可以在入口文件中这样写:
import Vue from 'vue'
import App from './App.vue'
new Vue({
  render: h => h(App)
}).$mount(document.querySelector('#app'))
我们在Vue官方文档中,肯定看到过这样一段提示内容:el提供的元素只能作为挂载点。不同于 Vue 1.x,所有的挂载元素会被 Vue 生成的 DOM 替换。因此不推荐挂载 root 实例到 html 或者 body 上。
在$mount方法中,我们也可以看到这样一段代码,它提示我们不能直接挂载到html或body上:
if (el === document.body || el === document.documentElement) {
  process.env.NODE_ENV !== 'production' && warn(
    `Do not mount Vue to <html> or <body> - mount to normal elements instead.`
  )
  return this
}
那么,为什么不能挂载到html或者body上呢,其实这是因为:$mount方法执行后,会直接替换挂载节点上面的内容,如果直接挂载html或者body上,很有可能会丢失掉一些东西,比如:meta,link或者script等。
- 处理template:处理
template是$mount方法的核心,这个过程也相对比较复杂,代码比较多一点,但流程还是比较清晰的。首先会对render进行判断,如果有render那么就不会再走处理template这部分的逻辑了,一个使用render的例子就是我们的main.js入口文件:
import Vue from 'vue'
import App from './App.vue'
new Vue({
  render: h => h(App)
}).$mount('#app')
因为在创建根实例的时候提供了render选项,因此在$mount方法中进行$options.render条件为真,直接走最后一步:调用原始$mount方法。
注意:其实我们使用Vue-Cli脚手架创建的项目,组件在$mount方法执行的时候,已经存在render函数了,这是因为vue-loader已经帮我们把template转换为render函数了,因此对于大多数情况来说不会走处理template的过程,只有少部分特殊情况才会走template处理。
在分析完提供render选择的分支后,我们来看一下不提供render选项的时候,处理template的逻辑。我们先看一下,什么情况下会走处理template,以下面代码为例:
export default {
  name: 'HelloWorld',
  data () {
    return {
      msg: 'Welcome to Your Vue.js App'
    }
  },
  template: `<div class="hello">{{ msg }}</div>`
}
这个时候对于条件判断template和typeof template === 'string'都为真,因此会走最后一步compileToFunctions(template, ...),这一步主要是把template编译成render函数,这个过程我们会在后续详细进行说明。转换完毕以后,在把render赋值到options.render上面,这个步骤就跟我们手动提供一个render函数是类似的。
处理template的过程我们已经整体介绍完毕了,然后我们来分析一下没有提到的细节问题,首先当我们判断完毕typeof template === 'string'后,为什么还进行了如下代码判断:
if (template.charAt(0) === '#') {
  template = idToTemplate(template)
  /* istanbul ignore if */
  if (process.env.NODE_ENV !== 'production' && !template) {
    warn(
      `Template element not found or is empty: ${options.template}`,
      this
    )
  }
}
这是因为,template我们可以直接传递一个DOM节点的id,例如:
export default {
  template: '#main'
}
这个时候,检查到template第一个字符为#号,然后调用idToTemplate,它的代码如下:
const idToTemplate = cached(id => {
  const el = query(id)
  return el && el.innerHTML
})
这段代码主要作用就是根据id查询DOM元素,然后返回它的innerHTML内容。
接下来第二个问题,为什么会有如下else if分支逻辑?
else if (template.nodeType) {
  template = template.innerHTML
}
这是因为,template除了可以接受字符串以外,还可以直接接受一个DOM元素节点,例如:
<div id="main">
  <div>dom</div>
</div>
export default {
  name: 'HelloWorld',
  template: document.querySelector('#main')
}
最后一个问题,如果我既没有传递render,也没有提供template,会发生什么呢?其实它会最后降级到去获取el选项,代码如下:
else if (el) {
  template = getOuterHTML(el)
}
如果render和template都没有提供,那么会在最后一步使用el选项,然后通过el获取DOM元素的outerHTML,innerHTML和outerHTML的区别如下:
// 模拟一个DOM元素
const dom = `<div id="main">
              <div>dom</div>
             </div>`

const innerHTML = '<div>dom</div>'
const outerHTML = `<div id="main">
                    <div>dom</div>
                   </div>``
- **调用原始mount
方法的最后一个步骤,也就是着重分析原始(公共)$mount`方法。我们先来回顾一下这个方法的实现代码:
Vue.prototype.$mount = function (
  el?: string | Element,
  hydrating?: boolean
): Component {
  el = el && inBrowser ? query(el) : undefined
  return mountComponent(this, el, hydrating)
}
在这个方法中,处理el的过程跟之前的没有什么区别,那么我们分析的重点就落到了mountComponent方法,这个方法是定义在src/core/instance/lifecycle.js文件中,其代码如下:
export function mountComponent (
  vm: Component,
  el: ?Element,
  hydrating?: boolean
): Component {
  vm.$el = el
  if (!vm.$options.render) {
    vm.$options.render = createEmptyVNode
    if (process.env.NODE_ENV !== 'production') {
      /* istanbul ignore if */
      if ((vm.$options.template && vm.$options.template.charAt(0) !== '#') ||
        vm.$options.el || el) {
        warn(
          'You are using the runtime-only build of Vue where the template ' +
          'compiler is not available. Either pre-compile the templates into ' +
          'render functions, or use the compiler-included build.',
          vm
        )
      } else {
        warn(
          'Failed to mount component: template or render function not defined.',
          vm
        )
      }
    }
  }
  callHook(vm, 'beforeMount')

  let updateComponent
  /* istanbul ignore if */
  if (process.env.NODE_ENV !== 'production' && config.performance && mark) {
    updateComponent = () => {
      const name = vm._name
      const id = vm._uid
      const startTag = `vue-perf-start:${id}`
      const endTag = `vue-perf-end:${id}`

      mark(startTag)
      const vnode = vm._render()
      mark(endTag)
      measure(`vue ${name} render`, startTag, endTag)

      mark(startTag)
      vm._update(vnode, hydrating)
      mark(endTag)
      measure(`vue ${name} patch`, startTag, endTag)
    }
  } else {
    updateComponent = () => {
      vm._update(vm._render(), hydrating)
    }
  }

  // we set this to vm._watcher inside the watcher's constructor
  // since the watcher's initial patch may call $forceUpdate (e.g. inside child
  // component's mounted hook), which relies on vm._watcher being already defined
  new Watcher(vm, updateComponent, noop, {
    before () {
      if (vm._isMounted && !vm._isDestroyed) {
        callHook(vm, 'beforeUpdate')
      }
    }
  }, true /* isRenderWatcher */)
  hydrating = false

  // manually mounted instance, call mounted on self
  // mounted is called for render-created child components in its inserted hook
  if (vm.$vnode == null) {
    vm._isMounted = true
    callHook(vm, 'mounted')
  }
  return vm
}
mountComponent方法代码看起来很多,其实做的事情并不复杂,我们可以把它分为三个步骤:callHook触发生命周期函数、定义updateComponent和定义渲染Watcher。
- callHook触发生命周期函数:这一部分最简单,只需要调用
callHook方法触发对应的生命周期即可,在mountComponent方法中,一共有三处触发生命周期的地方,分别是:beforeMount,mounted和beforeUpdate。 - 定义updateComponent:定义
updateComponent方法我们只需要看else分支即可,if分支主要做性能埋点相关的事情,这里会在开启浏览器performance时用到。updateComponent方法里面的代码调用了vm._update()这个方法的主要作用是触发组件重新渲染,而vm._render()我们在之前已经介绍过了。 - 定义渲染Watcher:在
mountComponent方法中定义了一个渲染Watcher,其中渲染Watcher的第二个参数传递了我们的updateComponent,这个参数会在渲染Watcher实例化的时候赋值给this.getter属性,当进行派发更新的时候,会遍历subs数组执行update,然后调用this.getter,也就是再次调用updateComponent,然后让组件重新渲染。
流程图
在分析完$mount方法后,我们可以得到如下流程图: