Switch 开关
逻辑分析
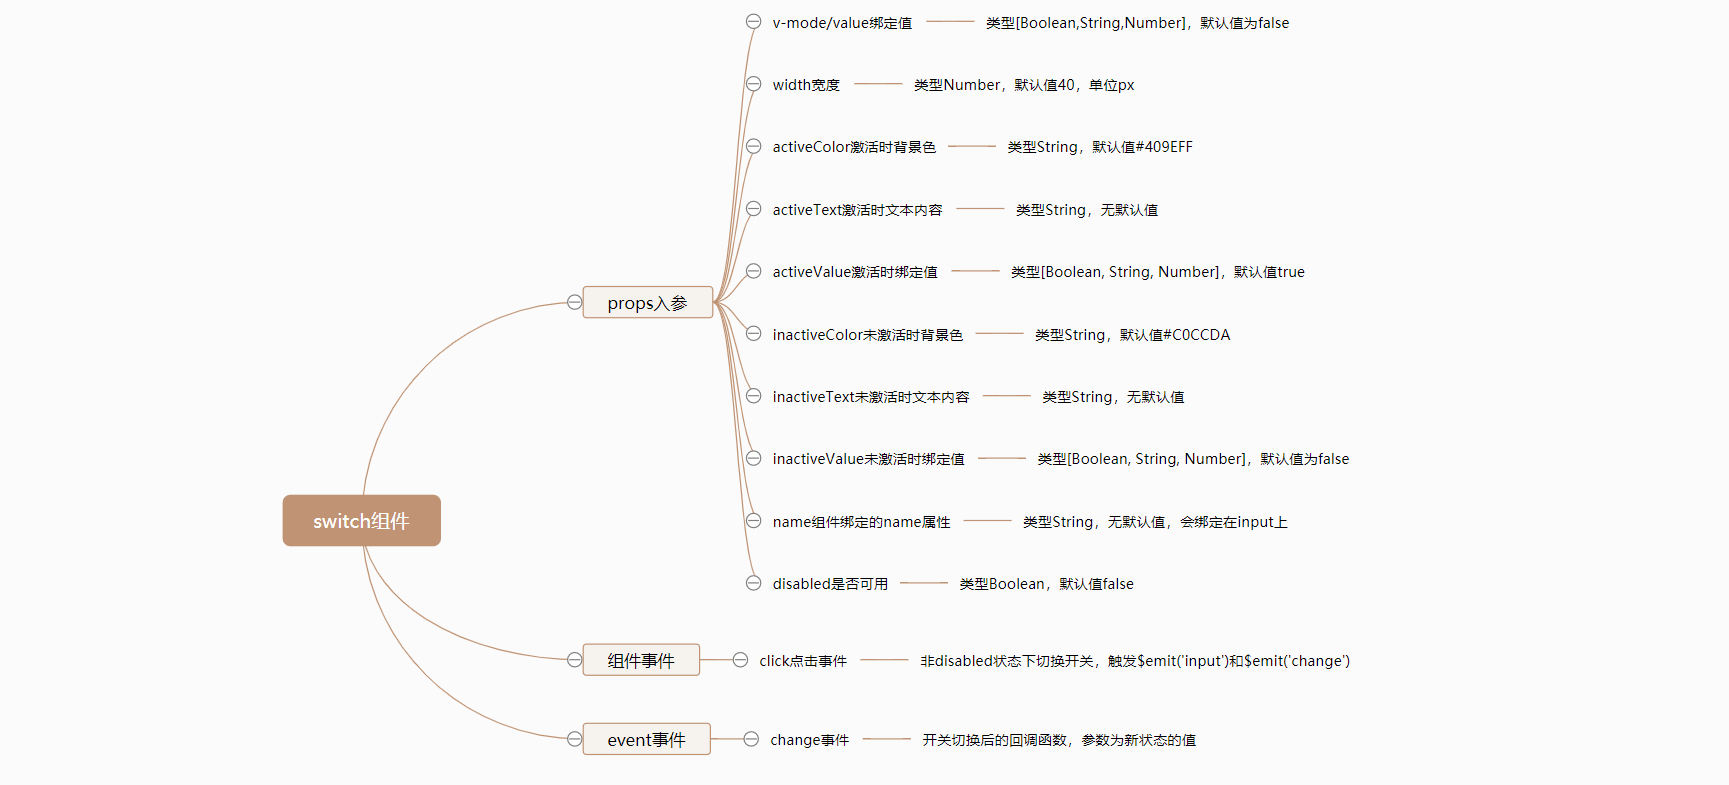
要整理Switch组件的实现逻辑,我们从以下几个方面开始:
props入参:对于每一个参数的类型,默认值以及描述。- 组件
event事件:组件自身的事件,例如click。 - 组件
$emit事件:组件向父组件触发的事件,例如change事件。
根据以上的分类,我们使用百度脑图,整理后的逻辑分析如下:

组件开发
准备
划分好实现步骤后,我们需要做一些前期的准备工作,按照我们在准备中提到的目录结构和规则,我们需要做以下步骤:
在src/base目录下新建switch目录,并在新建的src/base/switch目录中,再新建两个文件,分别是index.js和switch.vue。
# 新建 switch目录
$ mkdir switch

# 新建index.js和switch.vue文件
$ cd star
$ touch index.js
$ touch switch.vue
新建完毕后,src/base目录结构如下
|-- base
|   |-- star
|   |   |-- index.js
|   |   |-- star.vue
|   |-- badge
|   |   |-- index.js
|   |   |-- badge.vue
|   |-- switch
|   |   |-- index.js
|   |   |-- switch.vue
同时我们为switch.vue文件,撰写以下基础代码:
组件注册部分参考Star组件。
<template>
  <div class="mooc-switch">
    switch
  </div>
</template>
<script>
export default {
  name: 'MoocSwitch'
}
</script>
在以上步骤都正确完成后,我们在任意已经注册路由过的页面,使用mooc-switch组件,当出现switch文本内容即意味着Switch组件已经全局注册成功了。
基础实现
Switch组件中的value需要支持v-model。
根据我们个人对于Switch组件最主要的功能理解,我们将props属性和event事件做如下划分:
props入参:
value:开关的绑定值。width开关的大小disabled:是否禁用。activeValue:激活时的绑定值。inactiveValue:未激活时的绑定值。
event事件:
click:鼠标点击事件。
根据以上划分,我们的基础html结构代码如下:
<div
  class="mooc-switch"
  :class="{
    'is-disabled': disabled,
    'is-checked': checked
  }"
  @click.prevent="handleSwitchClick"
>
  <input
    ref="checkbox"
    type="checkbox"
    class="mooc-switch-input"
    @change="handleInputChange"
  >
  <span
    ref="SwitchRadius"
    class="mooc-switch-radius"
    :style="{
      width: `${width}px`
    }"
  ></span>
</div>
基础javascript代码如下:
export default {
  name: 'MoocSwitch',
  props: {
    value: {
      type: [Boolean, String, Number],
      default: false
    },
    width: {
      type: Number,
      default: 40
    },
    disabled: {
      type: Boolean,
      default: false
    },
    activeValue: {
      type: [Boolean, String, Number],
      default: true
    },
    inactiveValue: {
      type: [Boolean, String, Number],
      default: false
    }
  },
  computed: {
    checked () {
      return this.value === this.activeValue
    }
  },
  mounted () {
    this.$refs.checkbox.checked = this.checked
  },
  methods: {
    handleSwitchClick () {
      if (this.disabled) {
        return false
      }
      this.handleInputChange()
    },
    handleInputChange () {
      const val = this.checked ? this.inactiveValue : this.activeValue
      this.$emit('input', val)
      this.$emit('change', val)
      this.$nextTick(() => {
        this.$refs.checkbox.checked = this.checked
      })
    }
  }
}
代码分析:
v-model:在Vue官网中我们很容易了解到,让一个组件支持v-model的话,应该满足什么条件。所以我们需要在组件中使用一个checkbox标签以及在代码中需要$emit('input')事件。checked: 我们将checked定义为计算属性,用value的值和activeValue的值来判断switch组件处于开和关哪种状态。同时我们需要把这个值,绑定到原生checked标签之上。click:在switch组件中,我们通过点击来切换开关的值,所以在click事件中我们首先需要判断组件是否处于disabled状态,如果不是则调用handleInputChange方法,这个方法里面主要的作用是向外触发事件。同时需要特别注意的是:在handleInputChange方法中,我们向外触发的值是最新的值,而不是当前值,类似于"取反"的操作。
// is ok
const val = this.checked ? this.inactiveValue : this.activeValue
// is error
// const val = this.checked ? this.activeValue : this.inactiveValue
this.$emit('input', val)
this.$emit('change', val)
在撰写完html结构和js代码后,我们需要撰写我们的css代码:
我们把Switch组件中关于变量的定义全部放在src/assets/theme/src/switch-variables.styl文件中,如果你没有此文件,需要新建。
Switch组件中定义的变量如下:
$switch-radius-height = 20px
$switch-radius-btn-size = 16px
$switch-radius-border-radius = 10px
$switch-radius-border-width = 1px
$switch-radius-border-style = solid
$switch-radius-offset = 1px;
$switch-label-font-size = 14px
$switch-label-margin = 10px
$switch-transition-duration = 0.3s
$switch-disabled-opacity = 0.6
Switch组件基础css代码:
@import '~assets/theme/variables.styl';
@import '~assets/theme/src/switch-variables.styl';
.mooc-switch
  position: relative;
  display: inline-flex;
  align-items: center;
  vertical-align: middle;
  &.is-checked
    .mooc-switch-radius
      background-color: $base-primary;
      border-color: $base-primary;
      &::after
        left: 100%;
        margin-left: unit(- $switch-radius-border-width - $switch-radius-btn-size, 'px');
  &.is-disabled
    pointer-events: none;
    .mooc-switch-radius
      opacity: $switch-disabled-opacity;
      cursor: not-allowed;
  .mooc-switch-input
    width: 0;
    height: 0;
    opacity: 0;
  .mooc-switch-radius
    display: inline-block;
    vertical-align: middle;
  .mooc-switch-radius
    position: relative;
    height: $switch-radius-height;
    line-height: $switch-radius-height;
    background-color: $base-info;
    border: $switch-radius-border-width $switch-radius-border-style $base-info;
    border-radius: $switch-radius-border-radius;
    box-sizing: border-box;
    cursor: pointer;
    &::after
      content: '';
      position: absolute;
      left: $switch-radius-offset;
      top: $switch-radius-offset;
      width: $switch-radius-btn-size;
      height: $switch-radius-btn-size;
      background-color: #fff;
      border-radius: $base-border-radius-circle;
      transition: all $switch-transition-duration;
实现完以上基础代码后,我们使用如下测试代码对Switch组件进行测试:
<mooc-switch v-model="value"></mooc-switch>
export default {
  name: 'home',
  data () {
    return {
      value: true
    }
  }
}
测试结果如下:

组件完善
Switch组件实现了基础功能后就完成了我们预定的Switch组件大部分功能,接下来我们将对Switch组件进一步完善。
props入参:
activeColor: 激活时文字颜色。activeText: 激活时文字。inactiveColor: 未激活时文字颜色。inactiveText: 未激活时文字。name: 表单控件原生name属性。
完善后的html代码(改动为高亮部分):
<div
  class="mooc-switch"
  :class="{
    'is-disabled': disabled,
    'is-checked': checked
  }"
  @click.prevent="handleSwitchClick"
>
  <input
    ref="checkbox"
    type="checkbox"
    :name="name"
    class="mooc-switch-input"
    @change="handleInputChange"
  >
  <span
    v-if="inactiveText"
    v-text="inactiveText"
    class="mooc-switch-label mooc-switch-label-left"
    :class="{
      'is-active': !checked
    }"
  ></span>
  <span
    ref="SwitchRadius"
    class="mooc-switch-radius"
    :style="{
      width: `${width}px`
    }"
  ></span>
  <span
    v-if="activeText"
    v-text="activeText"
    class="mooc-switch-label mooc-switch-label-right"
    :class="{
      'is-active': checked
    }"
  ></span>
</div>
完善后的javascript代码如下(仅改动部分):
// 其它未改动部分略
export default {
  name: 'MoocSwitch',
  props: {
    activeColor: {
      type: String,
      default: ''
    },
    activeText: {
      type: String,
      default: ''
    },
    inactiveColor: {
      type: String,
      default: ''
    },
    inactiveText: {
      type: String,
      default: ''
    },
    name: {
      type: String,
      default: ''
    }
  },
  mounted () {
    this.setSwitchColor()
    this.$refs.checkbox.checked = this.checked
  },
  methods: {
    setSwitchColor () {
      const color = this.checked ? this.activeColor : this.inactiveColor
      if (color) {
        let switchRaduis = this.$refs['SwitchRadius']
        switchRaduis.style.backgroundColor = color
        switchRaduis.style.borderColor = color
      }
    }
  },
  watch: {
    checked (newVal, oldVal) {
      if (newVal === oldVal) {
        return false
      }
      this.setSwitchColor()
    }
  }
}
完善后的css内容如下(仅改动部分):
/* 其它样式略 */
@import '~assets/theme/variables.styl';
@import '~assets/theme/src/switch-variables.styl';
.mooc-switch
  .mooc-switch-label, .mooc-switch-radius
    display: inline-block;
    vertical-align: middle;
  .mooc-switch-label
    transition: color $switch-transition-duration;
    font-size: $switch-label-font-size;
    font-weight: normal;
    &.is-active
      color: $base-primary;
    &-left
      margin-right: $switch-label-margin;
    &-right
      margin-left: $switch-label-margin;
改动代码分析:
checked:对于switch开关组件而言,我们需要监听checked变量,当它状态改变的时候我们需要切换对应的颜色。setSwitchColor: 除了需要在mounted生命周期中调用一次以外,还需要在状态切换时调用。对于如何切换switch组件的颜色,一方面可以根据checked状态绑定不同的style,还可以像如上代码一样,使用ref拿到元素标签再进行绑定样式。v-if="inactiveText":只有当传递了inactiveText我们才显示文字标签,相同的道理activeText也是一样。
在我们完善Star组件后,我们需要进行一些必要的测试工作,我们使用如下的代码来进行测试:
<mooc-switch
  v-model="value"
  active-color="#f60"
  active-text="按月付"
  inactive-color="#666"
  inactive-text="按年付"
></mooc-switch>
export default {
  data () {
    return {
      value: true
    }
  }
}
测试结果如下:

未来计划
正如你所看到的那样,虽然我们支持v-model但并不支持表单,因为我们是以业务为导向,根据业务来逐步完善我们代码的,所以我们对未来做了一些Switch组件的迭代计划:
- 支持
form表单。
组件文档
在以上Switch组件完善以后,我们将得到一个比较完整的开关组件,但仅仅只是有组件对我们来说并不是十分足够的,我们还需要撰写一份关于Switch组件的使用文档,组件文档结构按照以下内容来撰写:
- 用法:
Switch组件的用法以及对应的案例。 - 属性:
Switch组件每一个props属性的描述,包含类型,默认值以及说明。 - 事件:
Switch组件相关的事件说明以及对应的案例。
Switch组件对应的文档地址为Switch组件文档,你可以点击这个地址查看更对内容。
← Badge 标记 Timeline 时间线 →