Timeline 时间线
逻辑分析
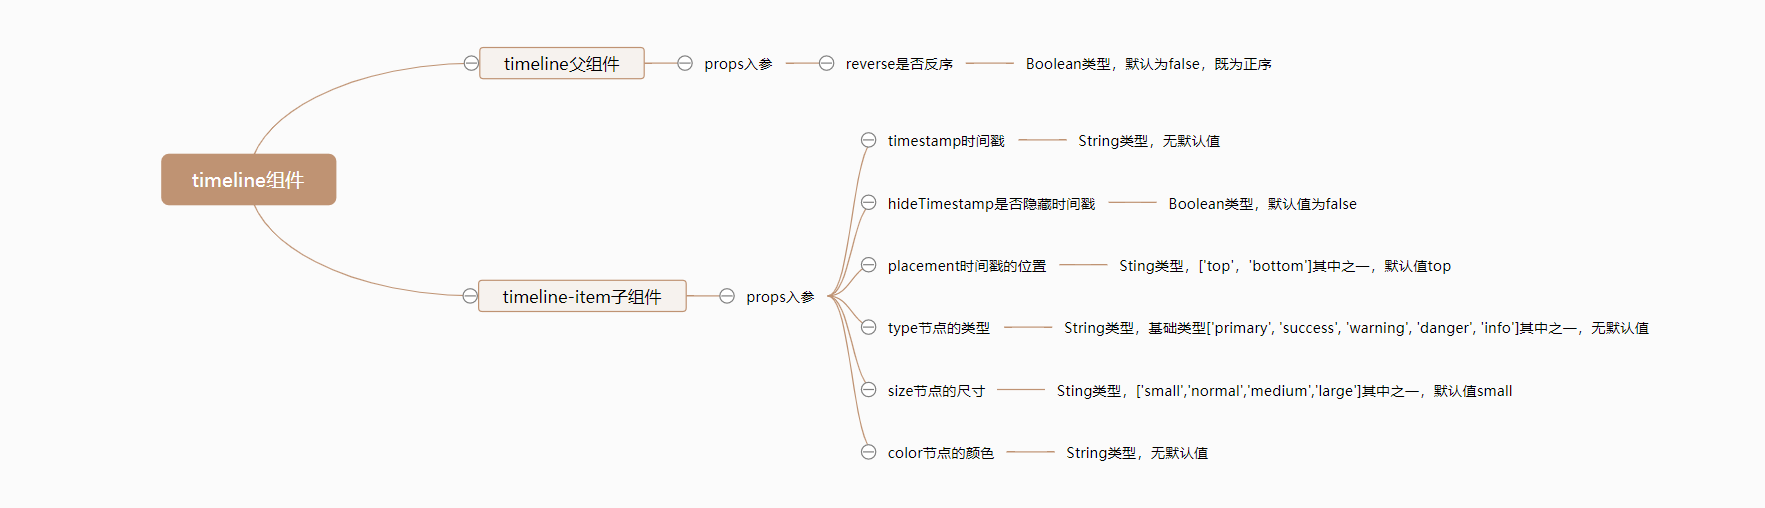
由于Timeline时间线组件相对来说比较简单,只有几个props入参,所以我们整理后的思维导图如下:
组件开发
对于简单的Timeline组件来说,我们直接一步到位,不需要拆分基础实现和完善。
准备
在以上思维导图整理完毕后,我们需要做一些前期的准备工作,按照我们在准备中提到的目录结构和规则,我们需要做以下步骤:
在src/base目录下新建timeline目录,并在新建的src/base/timeline目录中,再新建两个文件,分别是index.js和timeline.vue。
# 新建 timeline目录
$ mkdir timeline

# 新建index.js和timeline.vue文件
$ cd star
$ touch index.js
$ touch timeline.vue
新建完毕后,src/base目录结构如下:
|-- base
|   |-- star
|   |   |-- index.js
|   |   |-- star.vue
|   |-- badge
|   |   |-- index.js
|   |   |-- badge.vue
|   |-- switch
|   |   |-- index.js
|   |   |-- switch.vue
|   |-- timeline
|   |   |-- index.js
|   |   |-- timeline.vue
同时我们为timeline.vue文件,撰写以下基础代码:
timeline组件注册参考Star组件。
<template>
  <div class="mooc-timeline">
    <slot></slot>
  </div>
</template>
<script>
export default {
  name: 'MoocTimeline'
}
</script>
然后在src/base目录下新建timeline-item目录,并在新建的src/base/timeline-item目录中,再新建两个文件,分别是index.js和timeline-item.vue。
# 新建 timeline-item目录
$ mkdir timeline-item

# 新建index.js和timeline-item.vue文件
$ cd timeline-item
$ touch index.js
$ touch timeline-item.vue
新建完毕后,src/base目录结构如下:
|-- base
|   |-- star
|   |   |-- index.js
|   |   |-- star.vue
|   |-- badge
|   |   |-- index.js
|   |   |-- badge.vue
|   |-- switch
|   |   |-- index.js
|   |   |-- switch.vue
|   |-- timeline
|   |   |-- index.js
|   |   |-- timeline.vue
|   |-- timeline-item
|   |   |-- index.js
|   |   |-- timeline-item.vue
同时我们为timeline-item.vue文件,撰写以下基础代码:
timeline-item组件注册参考Star组件。
<template>
  <div class="mooc-timeline-item">
    timeline
  </div>
</template>
<script>
export default {
  name: 'MoocTimelineItem'
}
</script>
在以上步骤都正确完成后,我们在任意已经注册路由过的页面,使用如下代码使用timeline组件,当出现timeline文本内容即意味着timeline和timeline-item组件已经全局注册成功了。
<mooc-timeline>
  <mooc-timeline-item></mooc-timeline-item>
</mooc-timeline>
Timeline开发
根据以上思维导图,我们发现timeline父组件只有一个props属性,所以我们可以使用render的方式来渲染。
使用render方式渲染,就不需要再写template部分。
timeline父组件的js代码如下:
export default {
  name: 'MoocTimeline',
  props: {
    reverse: {
      type: Boolean,
      default: false
    }
  },
  render () {
    let reverse = this.reverse
    let slots = this.$slots.default || []
    let classs = {
      'mooc-timeline': true
    }
    if (reverse) {
      slots = slots.reverse()
    }

    return (
      <ul class={ classs }>
        { slots }
      </ul>
    )
  }
}
timeline父组件的css代码如下:
.mooc-timeline
  list-style: none;
代码分析:
render:除了我们常见的template方式撰写组件以外,我们还可以使用render方式去渲染。二者区别在于:render函数不会再像template一样走模板编译过程,其中render部分的书写格式是JSX方式,你可以通过查看官网Render渲染函数阅读更多关于render的内容。reverse:根据reverse的值,又因为slots是一个数组,所以我们可以使用slots.reverse进行节点内容的反转,从而达到让timeline时间线组件按正序或者反序排列的目的。
TimelineItem开发
根据上面的思维导图,我们列举timeline-item子组件的props入参:
timestamp:时间戳。hide-timestamp:是否隐藏时间戳。placement: 时间戳的位置。color: 节点的颜色。size: 节点的大小。type: 节点的类型。
timeline-item子组件的html结构如下:
<div class="mooc-timeline-item">
  <!-- line -->
  <div class="mooc-timeline-item-line"></div>

  <!-- dot -->
  <div
    v-if="!$slots.dot"
    class="mooc-timeline-item-dot"
    :style="{
      'background-color': color
    }"
    :class="[
      type && `mooc-timeline-item-dot-${type}`,
      size && `mooc-timeline-item-dot-${size}`
    ]"
  ></div>
  <div v-else class="mooc-timeline-item-dot-customer">
    <slot name="dot"></slot>
  </div>

  <!-- content -->
  <div class="mooc-timeline-item-wrapper">
    <div
      v-if="!hideTimestamp && placement == 'top'"
      class="mooc-timeline-item-timestamp is-top"
    >
      {{ timestamp }}
    </div>
    <div class="mooc-timeline-item-content">
      <slot></slot>
    </div>
    <div
      v-if="!hideTimestamp && placement == 'bottom'"
      class="mooc-timeline-item-timestamp is-bottom"
    >
      {{ timestamp }}
    </div>
  </div>
</div>
timeline-item子组件的js代码如下:
// baseType是组件的基础类型:['primary', 'success', 'warning', 'danger', 'info']
import { baseType } from 'assets/js/mooc.config.js'
export default {
  name: 'MoocTimelineItem',
  props: {
    timestamp: String,
    hideTimestamp: {
      type: Boolean,
      default: false
    },
    placement: {
      type: String,
      default: 'bottom',
      validator (val) {
        return ['top', 'bottom'].includes(val)
      }
    },
    color: String,
    type: {
      type: String,
      validator (val) {
        return baseType.includes(val)
      }
    },
    size: {
      type: String,
      default: 'small',
      validator (val) {
        return ['small', 'normal', 'medium', 'large'].includes(val)
      }
    }
  }
}
在撰写完以上html结构和js代码后,我们来处理组件的css:
我们把Timeline组件中关于变量的定义全部放在src/assets/theme/src/timeline-variables.styl文件中,如果你没有此文件,需要新建。
timeline-itme子组件中定义的变量如下:
$timeline-item-padding-bottom = 20px
$timeline-item-line-left = 4px
$timeline-item-border-left-size = 2px
$timeline-item-border-left-style = solid
$timeline-item-small-left = 1px
$timeline-item-small-size = 12px
$timeline-item-status-args = small normal medium large
$timeline-item-type-args = primary success warning danger info
$timeline-item-wrapper-padding-left = 28px
$timeline-item-content-line-height = 1
$timeline-item-timestamp-margin = 8px
timeline-item子组件的css样式代码如下:
@import '~assets/theme/variables.styl';
@import '~assets/theme/src/timeline-variables.styl';
@import '~assets/theme/mixin/timeline-mixin.styl';
.mooc-timeline-item
  position: relative;
  padding-bottom: $timeline-item-padding-bottom;
  &:last-child
    .mooc-timeline-item-line
      display: none;
  .mooc-timeline-item-line
    position: absolute;
    left: $timeline-item-line-left;
    top: 0;
    height: 100%;
    border-left: $timeline-item-border-left-size $timeline-item-border-left-style $base-border-second-color;
  .mooc-timeline-item-dot
    position: absolute;
    top: 0;
    border-radius: $base-border-radius-circle;
    background-color: $base-border-second-color;
    timeline-status($timeline-item-small-left, $timeline-item-small-size, $timeline-item-status-args);
    timeline-type($timeline-item-type-args, $base-primary $base-success $base-warning $base-danger $base-info);
    &-customer
      position: absolute;
      display: flex;
      justify-content: center;
      align-items: center;
  .mooc-timeline-item-wrapper
    position: relative;
    top: 0;
    padding-left: $timeline-item-wrapper-padding-left;
    .mooc-timeline-item-content
      line-height: $timeline-item-content-line-height;
      color: $base-font-first-color;
    .mooc-timeline-item-timestamp
      color: $base-info
      line-height: $timeline-item-content-line-height;
      &.is-top
        margin-bottom: $timeline-item-timestamp-margin;
      &.is-bottom
        margin-top: $timeline-item-timestamp-margin;
在以上样式中我们使用了两个mixin方法,它们定义在src/assets/theme/mixin/timeline-mixin.styl,代码如下:
如果你对于stylus语法还不是特别熟悉的话,你可以点击Stylus官网,还可以点击Stylus中文文档来学习更多内容。
timeline-status($left, $size, $args)
  for size, index in $args
    &-{size}
      left: unit(- ($left + index ), 'px');
      width: unit($size + index * 2, 'px');
      height: @width;

timeline-type($types, $colors)
  for type, index in $types
    &-{type}
      background-color: $colors[index]
如果你对以上mixin的形式还不是特别敏感的话,我们来看看没有使用mixin之前的部分代码:
/* 省略部分代码 */
@import '~assets/theme/variables.styl';
@import '~assets/theme/src/timeline-variables.styl';
.mooc-timeline-item
  &-dot
    position: absolute;
    top: 0;
    border-radius: 50%;
    background-color: $timeline-item-dot-color;
    &-small
      left: -1px;
      width: $timeline-item-dot-small-size;
      height: $timeline-item-dot-small-size;
    &-normal
      left: -2px;
      width: $timeline-item-dot-normal-size;
      height: $timeline-item-dot-normal-size;
    &-medium
      left: -3px
      width: $timeline-item-dot-medium-size;
      height: $timeline-item-dot-medium-size;
    &-large
      left: -4px
      width: $timeline-item-dot-large-size;
      height: $timeline-item-dot-large-size;
    &-primary
      background-color: $base-primary;
    &-success
      background-color: $base-success;
    &-warning
      background-color: $base-warning;
    &-danger
      background-color: $base-danger;
    &-info
      background-color: $base-info;
我们可以看到,size和type部分的样式代码大多是类似,但缺占据了很大的篇幅撰写,使用mixin方式后可以大大减少我们的代码撰写量。
组件测试
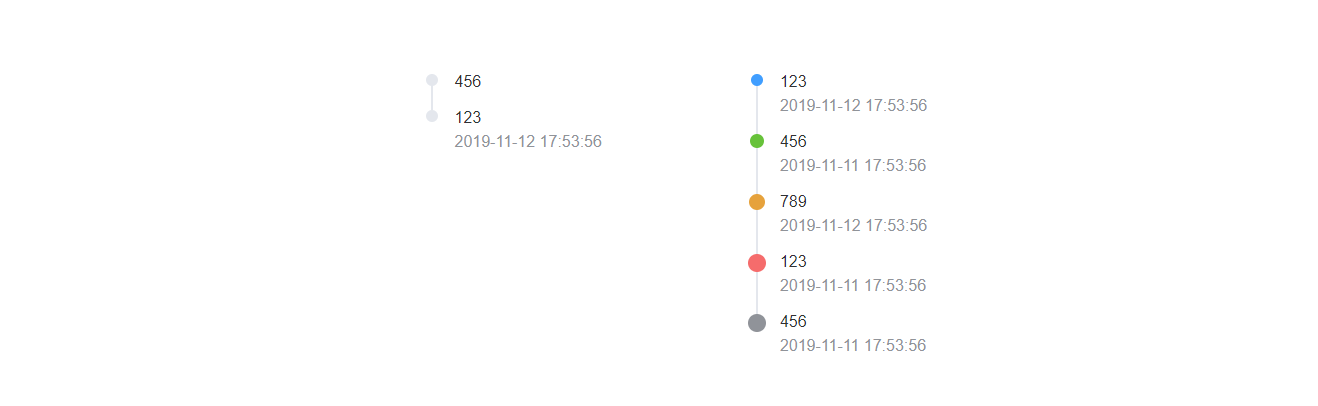
在写完以上timeline父组件和timeline-item子组件以后,我们需要对它们进行必要的测试,测试代码如下:
<mooc-timeline reverse>
  <mooc-timeline-item timestamp="2019-11-12 17:53:56">123</mooc-timeline-item>
  <mooc-timeline-item hide-timestamp placement="top" timestamp="2019-11-11 17:53:56">456</mooc-timeline-item>
</mooc-timeline>
<mooc-timeline>
  <mooc-timeline-item size="small" type="primary" timestamp="2019-11-12 17:53:56">123</mooc-timeline-item>
  <mooc-timeline-item size="normal" type="success" timestamp="2019-11-11 17:53:56">456</mooc-timeline-item>
  <mooc-timeline-item size="medium" type="warning" timestamp="2019-11-12 17:53:56">789</mooc-timeline-item>
  <mooc-timeline-item size="large" type="danger" timestamp="2019-11-11 17:53:56">123</mooc-timeline-item>
  <mooc-timeline-item size="large" type="info" timestamp="2019-11-11 17:53:56">456</mooc-timeline-item>
</mooc-timeline>
测试结果如下:
组件文档
在以上Timeline组件完善以后,我们将得到一个比较完整的时间线组件,但仅仅只是有组件对我们来说并不是十分足够的,我们还需要撰写一份关于Timeline组件的使用文档,组件文档结构按照以下内容来撰写:
- 用法:
Timeline组件的用法以及对应的案例。 - 属性:
Timeline组件每一个props属性的描述,包含类型,默认值以及说明。
Timeline组件对应的文档地址为Timeline组件文档,你可以点击这个地址查看更对内容。